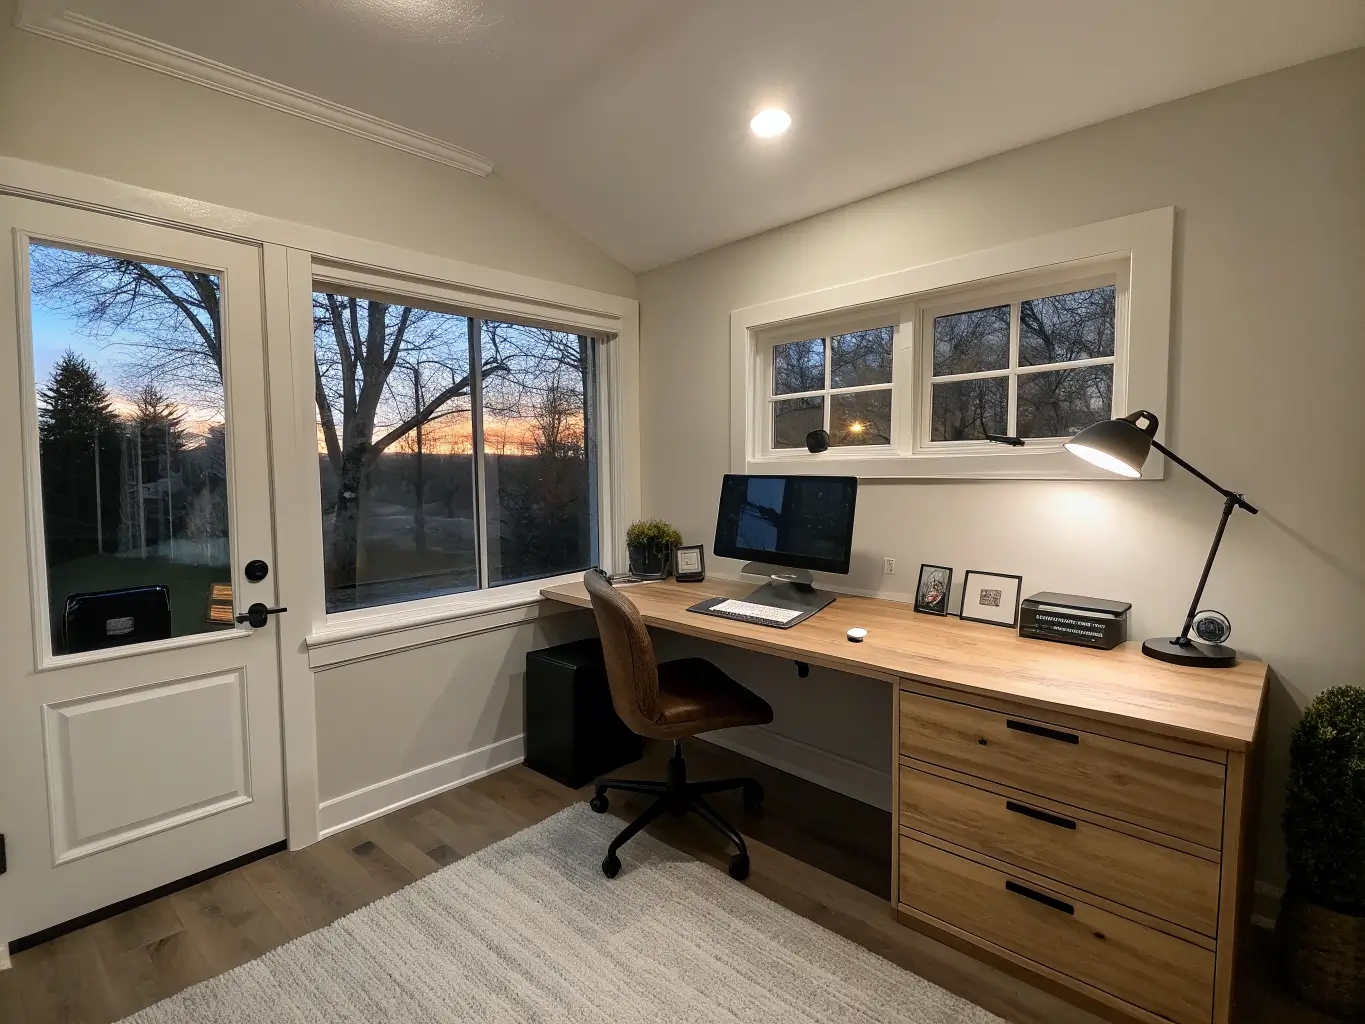
A basic lighting refresh takes 1–3 hours — new bulbs, a desk lamp, maybe a bias light behind the monitor. If you’re adding a ceiling fixture, swapping in dimmers, or running a full layered plan with smart bulbs, budget 1–2 days, especially if an electrician needs to get involved.
Cost-wise, here’s the real range:
– Bare-bones fix: around $50 — a monitor bias light ($15–$20) plus an adjustable desk lamp ($25–$30) – Solid, finished setup:$100–$300 — desk lamp, ceiling fixture upgrade, bias lighting, maybe a smart bulb or two – Premium/smart system: $400+ if you’re going tunable white bulbs throughout, designer fixtures, and app-controlled scenes
This works in any space — a corner in your bedroom, a built-in nook, a spare room turned office. Smaller spaces actually do better with wall lights, task lamps, and monitor light bars instead of a bulky floor lamp eating up square footage.
Skill level: Plugging in a new lamp and swapping bulbs is beginner-friendly. Hanging a pendant or installing a dimmer switch is intermediate — doable in a weekend if you’re handy. Full hardwired lighting plans or track lighting installs are where I’d call an electrician, because guessing at wiring is how you end up with a flickering fixture and a $300 service call to fix your own mistake.
This isn’t seasonal — you need it year-round — but it earns its keep hardest in winter, when you’re working in the dark by 5pm and the only light in the room is coming off your screen.
What This Look Actually Is
This isn’t a decor style like “farmhouse” or “coastal.” It’s function-first lighting design — the goal is a workspace that reduces eye strain, kills glare, and makes you look human on video calls, built around layering ambient, task, and accent light instead of relying on one fixture to do everything.
Finishes that show up again and again: matte black, brushed metal, white, and clear or frosted glass. Warm neutral tones soften the room; cool white light sharpens focus at the desk. Materials lean metal, aluminum, frosted glass, and LED strips — nothing fussy, nothing that fights with a screen-heavy environment.
Who needs this: remote workers, students, gamers, anyone doing back-to-back video calls, freelancers who work at odd hours. Basically anyone staring at a screen for six-plus hours a day who’s tired of headaches by 4pm.
Where it works: a dedicated office is the easy case, but this setup adapts to a desk wedged into a bedroom corner, a built-in shelf unit, or a multi-use living room desk that has to look normal when you’re not working.
The Must-Have Pieces
You don’t need all of this on day one, but this is the full list I’d build toward:
– Adjustable desk lamp — swiveling arm, built-in dimmer, focused beam. This is your workhorse for reading, writing, close detail work.
– Ambient ceiling light — flush mount, semi-flush, pendant, or recessed downlights. Whatever fills the room with even light so your monitor isn’t the brightest thing in a dark cave.
– Bias lighting / monitor light bar / LED strip behind or above your screen. This one sounds like a gimmick until you use it — it cuts the contrast between your bright screen and a dark room, which is a huge chunk of eye strain.
– Floor lamp if your desk doesn’t have room for a lamp, or you’ve got a reading chair nearby that needs its own light.
– Window treatment — sheers, blinds, or adjustable louvers. You want daylight in without a wall of glare hitting your monitor at 10am.
– Cable management, a desk organizer, monitor riser, desk pad. Not lighting, technically, but a messy desk under great light still looks like a mess. These make the lighting read as intentional.
Optional Upgrades Worth Considering
Once the basics are in, here’s where I’d spend next:
– Smart bulbs or a smart lamp — adjustable brightness and color temperature through the day. I run mine cooler in the morning, warmer after 6pm, all through an app. Genuinely changed how tired I feel by evening.
– Under-cabinet LED strips if you’ve got built-ins or open shelving — small detail, makes a compact office feel designed instead of just functional.
– Wall sconces or picture lights for accent — this is the difference between “workspace” and “room I don’t mind being in.”
– Metallic accents — brass, chrome, or blackened metal lamp bases tie the room together and make it feel less like a big-box store aisle.
– Organic texture — a linen lamp shade, a wood desk, ribbed or frosted glass. Modern office lighting can feel clinical fast; texture softens it.
– Seasonal bulb swaps — warmer temperature and textured shades in fall/winter, brighter cooler light in spring/summer.
How to Actually Put It Together
Layer your light — don’t rely on one fixture. This is the single biggest thing people get wrong. Ambient light fills the room, task light hits your work surface, accent/bias light handles the monitor. Skip any one of these and you’ll feel it by afternoon, even if you can’t name why.
Desk placement matters more than people think. Perpendicular to the window is the move — you get daylight without it blasting your screen or sitting directly behind you (which makes you a silhouette on every call). I had my desk facing a window for months thinking natural light was automatically good. It wasn’t. I couldn’t see my own screen past 10am.
If your desk has to face a window, add sheers or blinds. You still want the light, just diffused. Bare glass behind a monitor is glare city.
Lamp goes on the opposite side of your writing hand. Right-handed people, put the lamp on your left. Otherwise your hand casts a shadow over whatever you’re working on — small thing, constant annoyance.
Point light at your desk, not your screen. Anything aimed at the monitor creates reflection and fatigue. Light the surface around it instead.
Cool-to-neutral light for focus zones, warm light for anywhere you’re relaxing. I run 4000K to 5000K at my actual desk — it reads as clean, alert daylight. If your office doubles as a reading nook, keep that corner warmer, closer to 2700K–3000K.
Repeat one finish throughout the room. I went all black metal — lamp base, picture frame, desk organizer, even the pendant. It’s a small thing but it makes the room look chosen, not accumulated.
Setting It Up, Step by Step
1. Clear the desk first. You can’t judge lighting on a cluttered surface — you need to see what the light is actually doing.
2. Track the daylight. Sit at your desk at different times of day and note where glare hits your screen. This tells you exactly what your window treatment needs to solve.
3. Figure out your primary use — is this mostly computer work, handwriting, video calls, or reading? That decides where your task light needs to be strongest.
4. Position the desk — perpendicular to the window whenever the room allows it.
5. Swap bulbs before buying new fixtures. This is the cheapest, highest-impact move. 4000K–5000K for focus areas.
6. Layer in this order: ambient light first (so the room isn’t dim), then task lighting at the desk, then bias/backlighting behind the monitor, then accent lighting anywhere you want visual interest — a shelf, a piece of art, a textured wall.
I did this backwards the first time — bought a nice desk lamp before I’d even addressed the ceiling light, and my office still looked uneven, bright desk, dark everywhere else. Fix the room first, then zoom in on the desk.
Mistakes I’ve Made (So You Don’t Have To)
– Relying only on the overhead light. Flat, harsh, and it does nothing for screen glare. I lived with this for way too long thinking a “brighter room” was the goal. It’s not brightness, it’s balance.
– Window directly behind the desk. I mentioned this above because it’s the mistake I made first and hardest. Every video call, I was a shadow. Every afternoon, I couldn’t see half my screen.
– Warm bulbs at a work desk. Cozy, sure. Also makes we want to nap by 2pm. Save warm bulbs for the reading chair.
– Lamp on the wrong side. Small thing, constant low-grade frustration until you fix it.
– Aiming a bright lamp straight at the monitor. Feels like it should help. Just creates reflection and eye strain instead.
– A monitor glowing in an otherwise dark room. This is what bias lighting solves. Skip it and your eyes are working overtime adjusting between a bright screen and dark walls all day.
Keeping the Look Cohesive
Stick to 2–3 finishes max across the whole room — I learned this after ending up with a chrome lamp, a black picture frame, and a wood desk organizer that all fought each other visually. Pick black, brass, or wood and commit.
Match your bulb temperatures room-wide, too — nothing looks more accidental than one warm bulb next to one cool one, like the room forgot what mood it’s going for. And hide your cords. A great lighting setup with visible cable spaghetti underneath still reads as unfinished.
Budget Path and Seasonal Tweaks
Start cheap, build up:
– $15–$20 monitor bias light first
– Add a $25–$30 adjustable desk lamp
– Upgrade the ceiling fixture or add smart bulbs once the basics prove out
Seasonal swaps: warmer bulbs and a linen shade in winter when the room already feels dim; brighter, cooler bulbs and lighter shades in summer when you want the space to feel more awake.
This structure works across styles. Same layered approach, different finish — go matte black and exposed bulbs for an industrial lean, white and brushed brass for Scandinavian, rattan shades and warm wood for coastal. The lighting logic doesn’t change. Only the hardware does.
The $50 version of this — bias light plus one decent lamp — genuinely fixes 80% of the problem. Everything past that is refinement, not necessity. Start there.
For another angle on this, my home office ideas guide covers the same space from a different starting point.