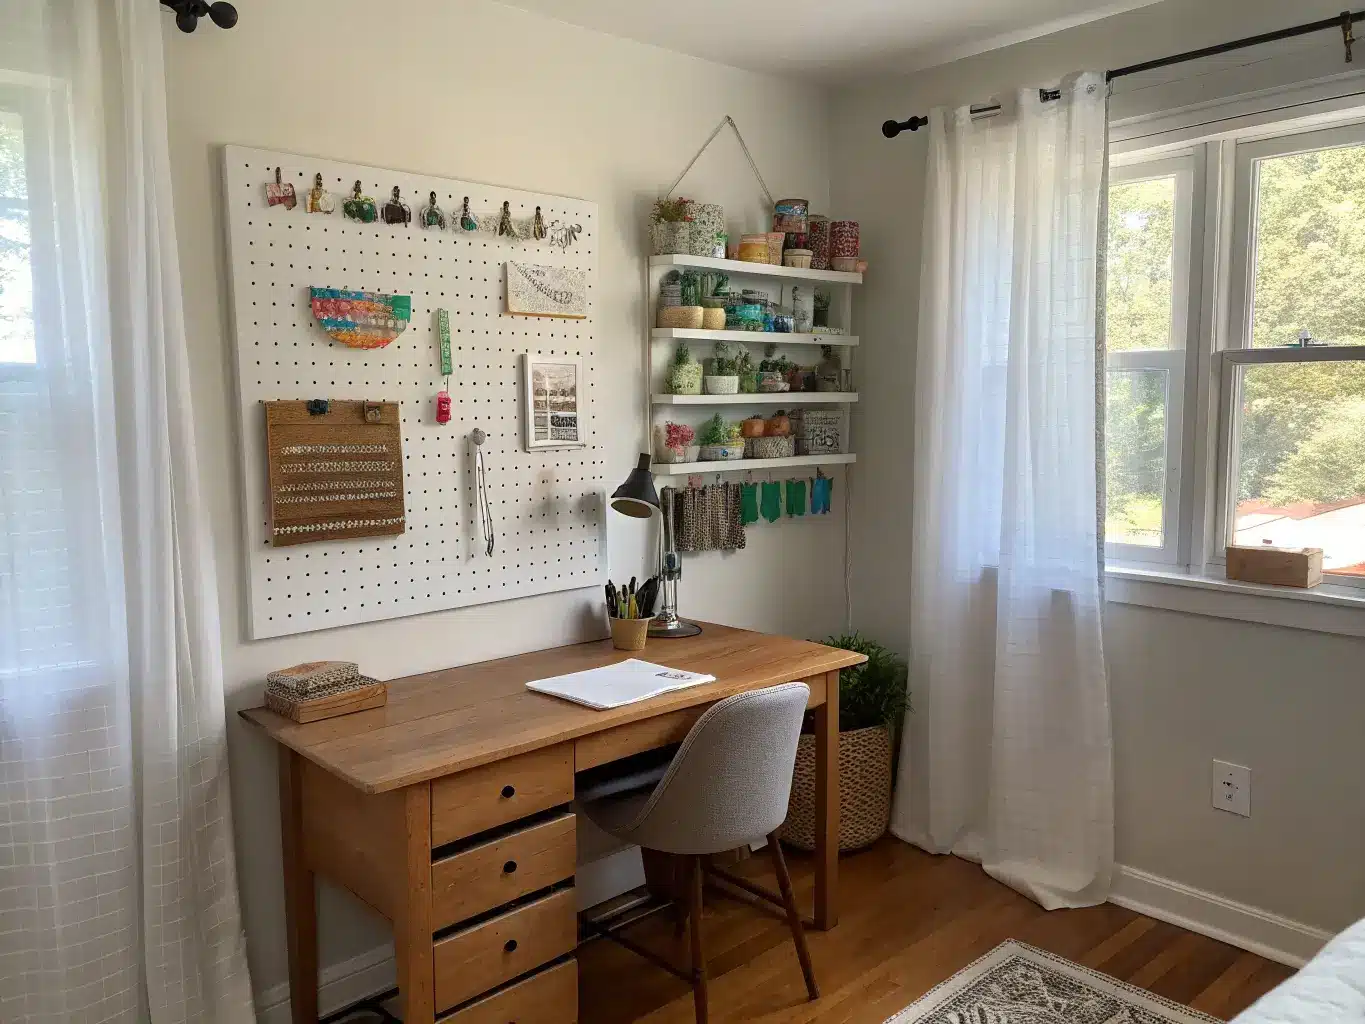
This isn’t a decorating trend with a name. It’s what I’d call creative utility — a room that’s organized enough to actually make things in, personalized enough that you want to spend time there, and built almost entirely from things you already own, thrifted, or bought under $30.
Who it’s for: anyone storing small, chaotic supplies — beads, ribbon, vinyl, thread, paper scraps — who’s tired of digging through a closet to find the good scissors. Renters, parents converting a spare room, anyone whose “craft room” is currently a corner of the garage.
Where it works best: spare bedrooms, closets, awkward office nooks, that weird space next to the laundry room nobody knows what to do with. Small rooms actually do better with this approach than big ones, because vertical storage forces you to be intentional instead of just piling bins on the floor.
Time and cost, realistically:
– A weekend gets you a functional refresh if you’re repurposing furniture you already have.
– Under $50 covers small fixes — pegboard, a few clear jars, some hooks.
– Under $100 gets you a full starter setup: a thrifted desk, a rolling cart from Facebook Marketplace, basic bins.
– $150–300 covers a real upgrade — cube shelving, a proper rolling cart from IKEA (the Raskog is the one everyone recommends and it’s earned it), task lighting.
I’ve seen budget makeover videos where someone painted plain wood shelves and added glitter accents for $18 a shelf — proof that one small styled detail can carry a whole wall without you needing a full renovation budget.
The Must-Have Pieces
Skip decor shopping until you have these. They’re the bones of the room.
– Pegboard. This is the single best dollar-for-dollar storage solution for craft rooms. A 4×2 foot pegboard from a hardware store runs $15–25, and with pegs and small shelves you can hang scissors, rulers, washi tape, ribbon spools, and cups of pens right at eye level.
– A rolling cart. Mine holds whatever project is in progress on top and glue guns, tape, and extra vinyl below. Being able to roll it out of the way when I need floor space, or park it next to me when I’m working, made the room feel twice as big.
– Clear bins and jars. For beads, buttons, embellishments — anything small enough to disappear into a drawer. Clear means you find things by looking, not by opening six containers.
– A desk you already own or thrifted. Don’t buy new here. I use a $40 mid-century desk I found at a estate sale with a coffee ring already on it — didn’t matter, it’s a craft desk.
– Wall shelving or cube storage. Keeps the floor open. This is where a lot of small craft rooms go wrong — they run out of floor space and never look up.
– Task lighting. A clamp lamp is $12–20 and solves the problem of good natural light disappearing by 4pm. I added an LED strip under my top shelf and it made detail work (hand-lettering, tiny bead work) noticeably easier.
– A labeling system. Cheap labels or even masking tape and a Sharpie. Sounds unnecessary until you’re the third person in the house who can’t find the extra glue sticks.
Optional Touches That Make It Feel Like a Room, Not a Supply Closet
Once the functional stuff is in place, these are worth the extra $20–50:
– Removable wallpaper on one wall or behind the desk. I did a $35 peel-and-stick floral panel behind mine and it’s done more for the room’s personality than anything else I bought.
– Color-coded supplies. Arranging ribbon or yarn by color on open shelves is organization and decor at the same time — free styling.
– Thrifted baskets or old industrial bins. An old metal locker basket or wire crate adds character that new plastic storage can’t fake.
– A rug and a throw. Sounds minor, but a $25 rug is what stopped my room from feeling like a supply closet with a desk in it.
– A little metal or acrylic. Brass hooks instead of plastic ones, a clear acrylic organizer for pens — small upgrades that read as “intentional” rather than “whatever was cheapest.”
How to Actually Put It Together
Start by sorting, not shopping. Before you buy a single bin, pull every craft supply you own into one pile and sort by category — paper, adhesives, fabric, tools, unfinished projects. You cannot plan storage for supplies you haven’t looked at in one place. I skipped this step the first time and bought bins that were the wrong size for literally everything I owned.
Measure the room before you buy anything. I mean actually measure — wall height, width, where the outlets are, how far the door swings open. My first shelving unit blocked my closet door by four inches. Four inches. Return trip, wasted gas, wasted time.
Put your desk near natural light, but angle it so you’re not staring into a window or getting glare on your work surface. Perpendicular to the window is usually the sweet spot.
Build in this order:
1. Storage wall first. Pegboard, shelves, or cubbies — whatever gives you the most vertical storage for the least cost. This is your foundation.
2. Rolling cart or mobile unit second. Current projects on top, backup supplies below.
3. Group everything by category or color. This is also your decorating — color-blocked ribbon and washi tape look styled without you doing anything extra.
4. Add lighting and one decorative element. One. A lamp and a piece of wall art. Don’t try to decorate every surface at once.
5. Use matching containers even if they came from different places. I have jars from a thrift store, a dollar store, and my own recycling, and because they’re all clear and roughly the same shape, the shelf reads as put-together.
Mistakes I’ve Made So You Don’t Have To
– Buying storage before measuring. Said it once, saying it again because it’s the single most common budget craft-room mistake. Layout first, products second.
– Ignoring the walls. My first setup had everything on the floor or on the desk and the walls were bare. The room felt cluttered even though I didn’t own that much stuff — because nothing was going up.
– Overbuying matching containers. You do not need the same brand of bin in every size. Repurposed jars, saved shipping boxes, and mismatched-but-similar-colored containers work fine.
– Going too dark or too busy. I painted one wall a deep teal in my first version of this room and it made the whole space feel smaller and harder to see supplies in. Repainted it a soft white within six months.
– Trying to organize everything on day one. Start with your most-used supplies. The scrapbook paper you haven’t touched in two years can wait for week three.
Keeping It Looking Good Long-Term
Pick 2–3 tones and stick to them. Mine is white walls, natural wood shelving, and black metal accents — hooks, cart, lamp base. The colorful stuff (my actual supplies) provides all the visual interest, so the “shell” of the room needs to stay quiet.
Repeat your container choice. If you’re using wire baskets, use wire baskets throughout, not wire in one spot and woven rattan in another. Consistency is what makes a room look organized instead of thrown together, even on a tight budget.
Only decorate with things that also work. The prettiest object in my craft room is a chippy vintage tackle box I use for washi tape. It’s decor and storage. That’s the whole philosophy.
Seasonal and Budget Refreshes
– Swap the rug or add a seasonal wallpaper panel — low-commitment, high-impact.
– Add one new organizer every month or two instead of all at once: a second cart, drawer dividers, another shelf.
– Lean the room toward a broader style if you want: add woven baskets and warm wood for a boho feel, or thrifted crates and mason jars for farmhouse. The vertical, functional bones stay the same underneath whatever aesthetic you layer on top.
The craft room that actually gets used isn’t the one that looks best in a photo. It’s the one where you can find your glue gun in under ten seconds. Build for that first, decorate second.
For another angle on this, my diy craft room guide covers the same space from a different starting point.