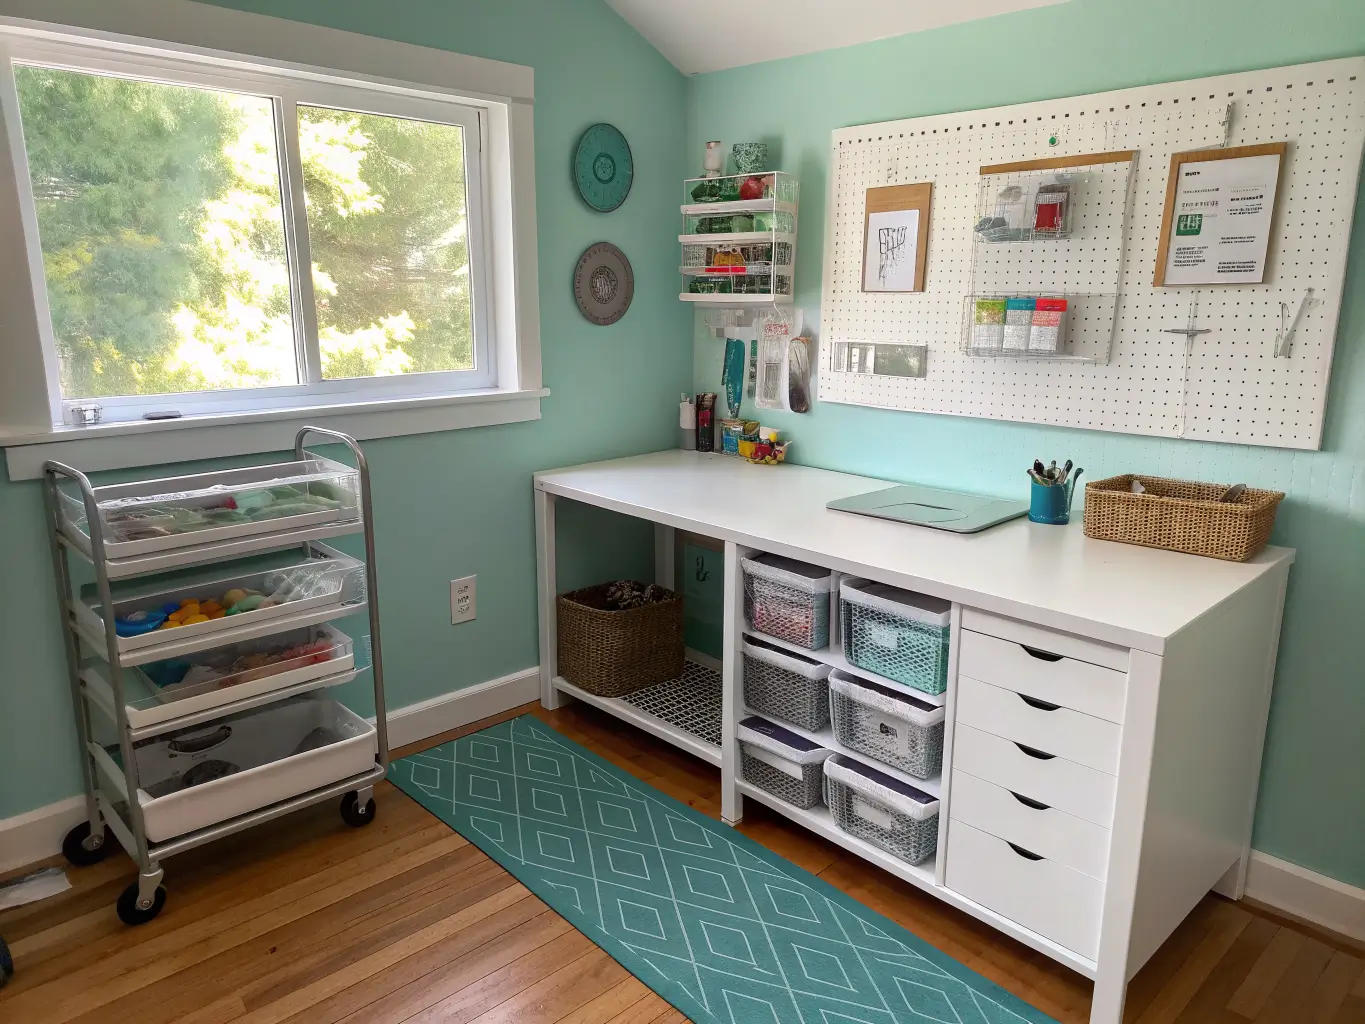
You know the problem before you even walk into the room: ribbon spilling out of a drawer, vinyl rolls leaning in a corner like they’re about to fall on you, and a sewing machine buried under fabric you bought for a project you started in March. A DIY craft room isn’t about making a Pinterest-perfect studio. It’s about building a system where you can actually find your rotary cutter without turning the room upside down.
I’ve built three craft spaces in three different homes — a closet, a corner of a guest room, and now a converted laundry nook — and every single one taught me something the last one got wrong. The closet version looked cute for about six weeks before it became a black hole for washi tape. Here’s what I’d tell you if you were standing in my kitchen asking where to start.
Quick Style Snapshot: Time, Cost, and Space Needed
Before you buy a single bin, get realistic about scope.
– Time: A small corner setup — desk, cart, a few bins — takes a weekend. A full room with painted walls, built storage, and labeled zones takes 1–2 weeks, especially if you’re waiting on paint to cure or hardware to ship.
– Cost: A thrifted, scrappy starter setup runs $100–$300. A polished room with a real desk, pegboard, rolling cart, drawer storage, and proper lighting lands $300–$1,000+, depending on how much you build versus buy new.
– Space: Corners, closets, spare bedrooms, laundry rooms, basement nooks, and sheds all work. Most people I know don’t have a dedicated room — they carve one out of something else.
– Skill level: Pegboards, bins, labels, and paint are beginner territory. Built-ins, fold-down wall tables, and custom desks push into intermediate-to-expert carpentry.
– Seasonality: Year-round function, with easy seasonal refreshes through textiles and accent swaps.
What Design Style Actually Works Here
Most craft rooms land somewhere in functional-organized studio territory — practical first, pretty second. Within that, people lean toward modern utility, cottagecore-vintage, boho, farmhouse, or a soft neutral palette depending on their own taste.
The materials that show up again and again: light aqua, charcoal blue, white, warm wood tones, wicker baskets, wire bins, clear acrylic containers, pegboard, and metal rolling carts. That combination works because it’s visually calm even when the room is stuffed with supplies — which, let’s be honest, it will be.
This setup is built for sewists, paper crafters, Cricut users, mixed-media makers, homeschool families, and gift wrappers. Basically: anyone whose hobby involves more than three types of adhesive.
The Must-Have Pieces That Make a Craft Room Function
Your primary work surface
This is the anchor of the room. Height matters more than people think:
– 28–30 inches for seated tasks like hand-sewing or paper crafting
– 36 inches for standing assembly work
– 38–40 inches for precision cutting, where you don’t want to hunch
I made the mistake of using a standard 30-inch desk for everything, including cutting fabric, and my back paid for it for a solid year before I added a taller cutting table on the side.
Pegboard or wall grid
This is the single most repeated solution in craft-room setups, and for good reason. Scissors, rulers, tape measures, and anything you reach for constantly should live on the wall, not buried in a drawer.
A rolling cart
Mine holds whatever I’m actively working on — thread, adhesive, current project pieces. It moves where I need it and tucks away when I don’t. In a small room, this flexibility matters more than a fixed second table.
Clear bins with shallow drawer trays
Deep bins are where small items go to disappear. Stick to 3–4 inch drawer trays for buttons, clips, and notions — anything smaller than a fist gets lost in anything deeper.
Labeled containers
Clear jars and labeled drawers for ribbon, markers, buttons, and clips. I use plain kraft labels with a label maker — nothing fancy, just consistent.
Task lighting
This is the one thing people skimp on and regret. Craft work needs 700–1,000 lux at the actual work surface — much brighter than a bedroom lamp — with 300–500 lux in relaxed zones like a reading nook. Look for CRI 90+ bulbs, especially if you’re color-matching fabric or thread. A cheap warm-white bulb will lie to you about color every time.
An inspiration wall
A cork board, clip rail, or magnetic strip for pinning ideas, swatches, or works in progress. It’s the one purely fun element in an otherwise function-first room.
Supporting decor
A woven basket or two, one framed print, a small rug, and a plant shelf go a long way toward making the room feel like a space you want to be in, not just a storage unit.
The signature project: a DIY ironing board
If you sew, build one instead of buying it. Cut hardboard to roughly 81 x 95 cm, layer three rounds of cotton batting on top, then staple fabric tight around the edges. Costs under $20 in materials and fits spaces a standard ironing board can’t.
Optional Enhancements Worth Considering
– Seasonal accents — swap pillow covers and basket liners for the season instead of redoing the whole room
– Organic touches — a small plant or vertical plant shelf softens all that hard plastic and metal
– Metallic hardware — brass pulls or a matte black lamp arm add contrast against soft palettes
– Scent — a candle or diffuser if the room is enclosed, but keep it well away from fabric scraps and paper
Pro Styling Tips for a Room That Looks Intentional, Not Chaotic
Keep the palette tight. One main neutral plus one accent — white and light aqua, or white and charcoal blue. In a room already full of colorful supplies, a busy wall color competes for attention it doesn’t need.
Treat vertical storage as decor. A pegboard styled in zones — cutting tools on the left, adhesives on the right — reads as organized. The same pegboard with everything jumbled reads as clutter, even though it’s the identical amount of stuff.
Mix opaque and clear. Clear bins for anything you need to grab quickly by sight. Woven baskets or closed drawers for the bulk stock and the ugly stuff you don’t want on display.
Zone by activity. Concept and planning, prep, making, finishing, storage — five distinct jobs, five distinct spots if you have the room. Even in a closet, you can fake this with a two-tier system: eye-level for active work, above and below for storage.
Let the workspace be the star. Desk or cutting table goes in the best light in the room. Everything else gets arranged around it, not the other way around.
Setting Up the Room: Step by Step
Prep the space first
Measure the room before buying anything. Then make an honest list of what you actually craft — not what you think you might someday craft. I bought an entire drawer system sized for scrapbooking paper before realizing I hadn’t touched a scrapbook in two years. That system now holds fabric.
Clear out duplicates and supplies you don’t use. Place big items first — desk, cabinet, cart — then wall storage, then the small containers. Keep 30–36 inches of clear pathway so you can actually move through the room with an armful of fabric or a rolling cart.
Position the main work area near natural light if you have any, and back it up with task lighting for the days the weather doesn’t cooperate.
Build the look in layers
1. Paint the anchor color first — white, light aqua, or charcoal blue are the most common bases for a reason: they don’t fight with colorful supplies.
2. Install pegboard or wall rails directly above the workstation.
3. Group supplies by craft type — sewing near the machine, paper supplies together, anything messy (paint, ink) in its own contained zone.
4. Bring in the rolling cart for active projects.
5. Style the small stuff: jars for pens and brushes, baskets for bulk, drawers for notions, a wall for inspiration.
6. If you ever film or photograph in the room, keep one wall clean and neutral as a backdrop.
Mistakes I’ve Made So You Don’t Have To
– Buying storage before sorting supplies. I bought bins for an inventory I hadn’t actually looked at in years. Half of them sat empty. Sort first, buy second.
– Deep bins for tiny items. My button collection lived at the bottom of a 10-inch bin for two years. I never once found the button I needed on the first try. Shallow trays fixed it overnight.
– Skimping on lighting. I ran my first craft corner on one ceiling fixture. Everything I color-matched under that light looked wrong in daylight. A $40 task lamp with a high CRI bulb solved it completely.
– Mixing too many styles and colors. Rainbow bins plus patterned baskets plus a busy accent wall is a lot, even for a creative space. Pick your palette and stop.
– Skipping zones. Painting and sewing in the same six square feet means you’re constantly cleaning up one to do the other. Even a rolling cart that separates “messy” from “clean” helps.
– Blocking your own path. In small rooms it’s tempting to push furniture wherever it fits. If you can’t walk from the desk to the cart without turning sideways, something needs to move.
Keeping the Room Looking Good Long-Term
Repeat your systems. Same bin style, same label format, same metal finish throughout. A room with five different container types never looks finished, no matter how organized it actually is.
Cap your decor palette at 2–3 colors. This keeps a supply-heavy room feeling calm instead of visually loud.
Rotate what’s visible, not what’s stored. Swap seasonal items on open shelves; keep bulk stock in closed storage year-round. This is how you refresh the room without redoing it.
Update cheap, update often. A thrifted desk, a repainted filing cart, reused glass jars, paper-covered boxes — none of this needs to be expensive to look pulled together. My rolling cart came from a restaurant supply store for $35 and gets more compliments than anything else in the room.
If you’re planning a cross-style look, cottagecore-vintage, boho-with-an-organization-wall, and coastal light-blue-and-white studio setups are all having a moment right now and all work well with the same bones — pegboard, clear bins, rolling cart, natural textures underneath.
And if your budget only stretches to one upgrade this month, skip the decorative extras. Put the money into lighting, labels, and a pegboard first. Everything else is easier to fake with what you already own.
For another angle on this, my craft room ideas guide covers the same space from a different starting point.