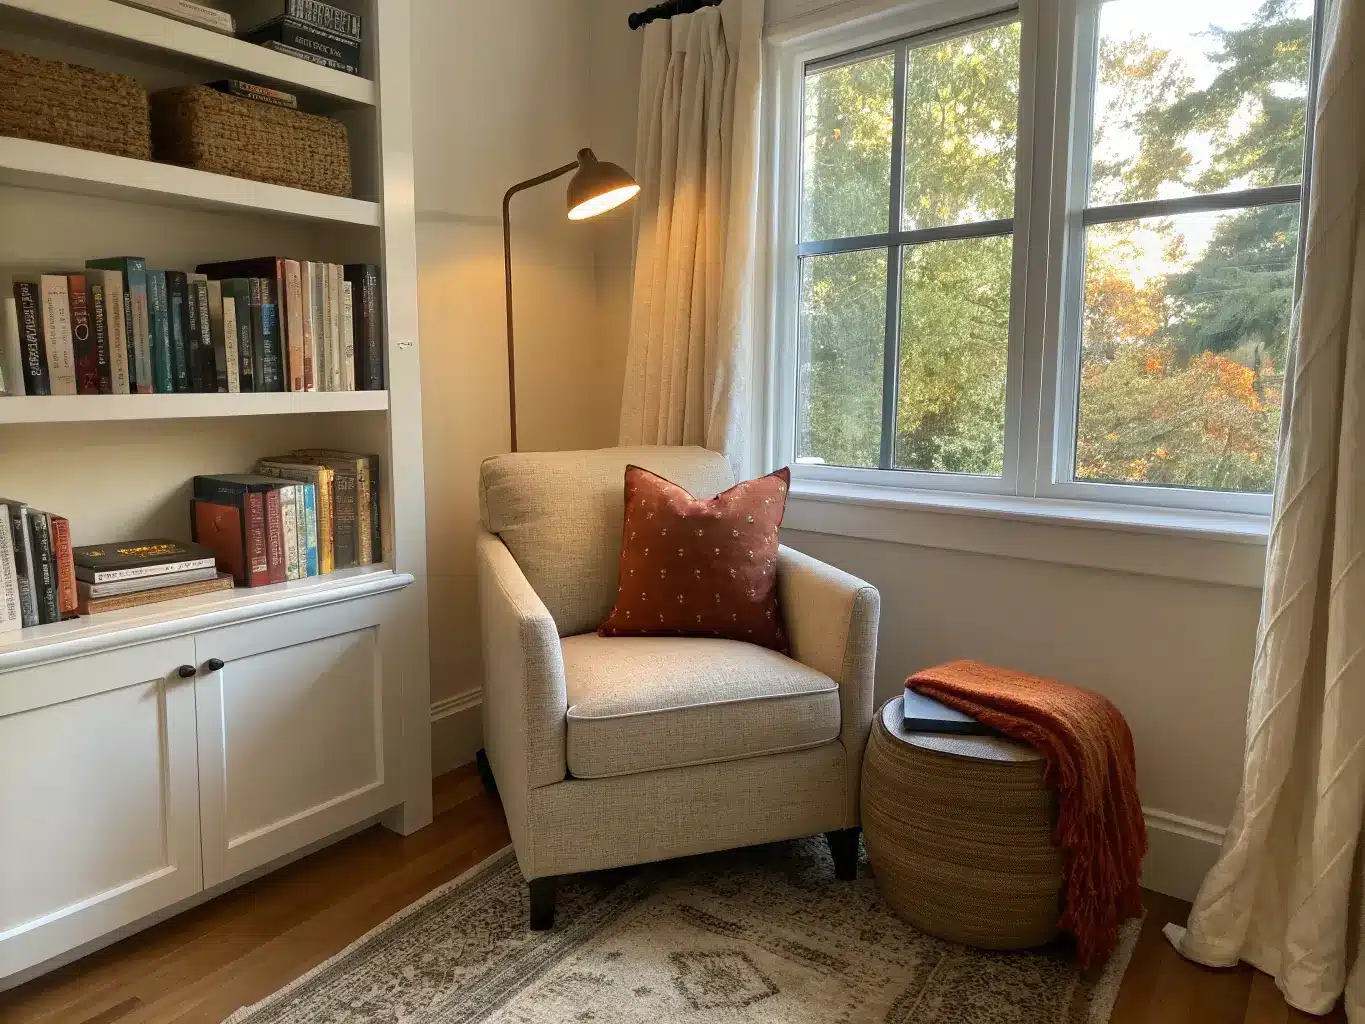
Every time I mention “reading nook” to someone with a small apartment, they say the same thing: “I don’t have room for that.”
I get it. I didn’t think I had room either. I made mine in a 32-inch-wide gap between my bedroom window and a bookshelf that used to just collect dust and a laundry basket. Turns out you don’t need a spare room. You need a corner, a chair that fits it, and about $300 if you’re smart about where you spend.
If you’ve been Googling “small space reading nook ideas” at 11pm trying to figure out whether that awkward dead zone in your apartment can become something useful, here’s everything I’ve learned building three of these — one that failed completely, and two that actually get used every day.
What This Look Actually Is
The reading nooks that work right now aren’t the Pinterest fantasy ones with a round window and a built-in daybed. Most of us are working with a corner, a closet, an under-stair triangle, or a bay window that’s currently a junk drop zone. The style that suits these spaces is cozy-minimal — think warm neutrals, one good chair, soft layers, and restraint everywhere else.
Materials lean natural: linen, boucle, wool, wood, woven baskets. Colors stay warm and quiet — cream, oatmeal, taupe, sage — with maybe one deeper accent like forest green or rust in a pillow or throw. This isn’t a maximalist project. The smaller the space, the more a single wrong color or an extra knickknack throws the whole thing off.
Who this is for: apartment dwellers with one useless corner, parents who need a kid’s quiet zone, anyone who owns more books than surfaces to read them on. Where it works: bedroom corners, living room dead space, window bays, under-stair triangles, spare closets, hallway alcoves.
Time, Cost, and Space Reality Check
Time: A simple corner with a floor cushion and a lamp — a few hours, start to finish. A closet conversion or window seat build, with painting and possibly some carpentry, is a weekend project minimum. My closet nook took two full Saturdays because I underestimated how long it takes to paint a space that’s basically four walls in your face.
Cost, realistically:
– Budget ($80–$250): floor cushion or small accent chair, one throw, a basket for storage, a clip-on or small lamp
– Mid-range ($250–$900): a real upholstered chair, ottoman, wall sconce, small floating shelf, a rug
– Built-in or closet conversion ($500–$2,500+): carpentry, paint, electrical for lighting, custom cushions
I spent $140 on my first attempt (a beanbag and a floor lamp from a big box store) and hated it within a month — more on that below. My second nook, the closet conversion, ran about $680 including a cushion I had custom-cut for the bench seat, which alone was $180.
Space needed: You can make this work in as little as 2–4 feet of width if you’re smart about seat depth. Aim for 24–30 inches of seat depth and keep at least 28–30 inches of clear floor space in front of the seating so you can actually get in and out without climbing over anything.
Skill level: Beginner for a chair-and-lamp setup. Intermediate to expert if you’re building in a bench, adding trim, or converting a closet with electrical work.
The Pieces That Actually Make a Reading Nook Work
Seating is the whole project. Everything else is decoration. Your options, roughly in order of what I’d try first for a tiny space:
– Compact upholstered armchair — my top pick if you have 30+ inches of width. Look for slim arms (2–3 inches, not the fat rolled-arm style) so it doesn’t eat the room
– Window bench or built-in seat — best if you already have a bay window or can frame one in; makes use of dead space under the sill
– Floor cushion or beanbag — cheapest option, works in tiny closets, but gets old fast if you’re over 30 and your knees remind you of it
– Storage ottoman as a seat — genius for tiny spaces because it does double duty, but skip it if you need back support for long reading sessions
I learned the hard way that a floor cushion looks great in photos and terrible after 20 minutes of actual reading. My back gave up before my book did. I upgraded to a small barrel chair from a secondhand shop ($75, reupholstered in a $40 remnant of oatmeal boucle) and never looked back.
Lighting is not optional. This is the mistake almost everyone makes. A nook with pretty pillows and no proper light is just a corner you’ll abandon after dark. You need:
– A wall sconce mounted at roughly shoulder height when seated (about 50–55 inches from the floor) — best for tiny spaces because it frees up floor and table space
– A swing-arm lamp if you can’t run new electrical — clamps to a shelf or bookcase
– A small table lamp on a side table if you have the surface room
Aim for warm bulbs, around 2700K–3000K — anything cooler will make the space feel clinical instead of cozy. For actual reading comfort you want something in the 300–500 lux range at the page, which most 40–60 watt equivalent warm LED bulbs will give you at close range.
Book storage should be within arm’s reach, not across the room. A floating shelf (I used a 24-inch one, $22 from a hardware store, painted to match the wall so it disappears) or a narrow ladder shelf works better than a full bookcase in tight quarters — a bookcase reads as furniture, a floating shelf reads as detail.
Soft layers finish it off: one throw blanket, one or two lumbar pillows, a small rug (even a 2×3 remnant helps define the space and adds warmth underfoot). Don’t go past two pillows in a tiny nook — I tried four once and it looked like a pillow fort, not a place to sit.
One small surface for tea, glasses, or your phone. A tiny side table, a wall-mounted ledge, or even a stool works.
Optional Upgrades Worth Considering
If the basics are covered and you want to push it further:
– A mirror hung opposite the window bounces light around and makes the whole nook feel less enclosed — this made a bigger visual difference in my closet nook than anything else I added
– A small plant — I use a 6-inch pothos on the floating shelf because it survives low light and trails nicely over the edge
– Brushed brass or matte black hardware on the sconce or side table adds a bit of contrast against all that soft neutral fabric
– A basket for spare blankets or current reads — closed storage keeps the whole thing from looking cluttered
How to Actually Put It Together
Step 1: Measure before you buy anything. I cannot stress this enough — I bought a chair for my closet nook based on a guess, and it was four inches too deep to let the closet door close. Measure width, depth, and ceiling height (if it’s under stairs or in an attic slope) before you shop.
Step 2: Clear the space completely and decide if it should feel open or enclosed. A curtain across a closet nook can make it feel like a proper retreat; removing the door entirely makes it feel like part of the room.
Step 3: Paint if needed. Light or warm neutral paint (I used a soft warm white, similar to Benjamin Moore’s White Dove) makes a tiny footprint feel less like a box you’re sitting inside.
Step 4: Plan your outlet or lighting access early. Don’t get to the styling stage and realize the nearest outlet is across the room. This is the step people skip and regret.
Step 5: Bring in the big piece first — chair, bench, or cushion platform. Everything else gets arranged around it.
Step 6: Add lighting second, before you style anything else. Solve function before you solve looks.
Step 7: Add the book storage and one small surface.
Step 8: Layer your textiles last — one throw, one or two pillows, one rug. Stop there.
Mistakes I’ve Made So You Don’t Have To
– Buying the chair before measuring the space. Did this. Returned a chair. Learned my lesson.
– Going for a deep lounge chair because it looked comfortable in the store. In a tiny nook, a chair with fat arms or deep seating eats all your floor clearance. Go slim.
– Skipping task lighting because the room “gets some daylight.” Great until 4pm in winter and you’re squinting at a paperback.
– Over-accessorizing. A nook with six pillows, three baskets, a tray, and a stack of magazines doesn’t feel cozy — it feels like storage overflow. Pick fewer, better things.
– Forgetting about circulation. If you can’t comfortably sit down and stand up without knocking your knee on a shelf, the space isn’t working, no matter how good it looks in a photo.
Keeping It Looking Right Long-Term
Stick to 2–4 colors total in the nook — I run cream, warm white, one wood tone, and a rust-colored pillow, and that’s it. Adding a fifth color always makes it feel busier than it needs to be, even in a space this small.
Repeat materials for cohesion: I use wood (the shelf) and linen/boucle (the chair and pillow) throughout, nothing else competing for attention. Keep a basket nearby for the stuff that accumulates — charging cords, the book you’re not reading right now, a spare blanket — so the surfaces stay clear.
Seasonal refresh is cheap and easy: swap in a chunkier knit throw and a deeper-toned pillow cover for winter, switch to lighter cotton and a pale linen cover in summer. I own exactly two pillow covers and one heavier throw that comes out around November — that’s the entire seasonal rotation, and it’s enough.
If you want to push the style further, boho leans into woven textures and floor cushions with plants everywhere; coastal goes pale blue and white with natural wood; modern strips it down to a low-profile chair, one sconce, and almost nothing else. All three work in the same footprint — it’s really about which textiles and accessories you choose, not the bones of the setup.
The whole point of a tiny reading nook is that it’s small enough to finish. Don’t let it become a bigger project than the corner deserves.
For another angle on this, my reading nook guide covers the same space from a different starting point.