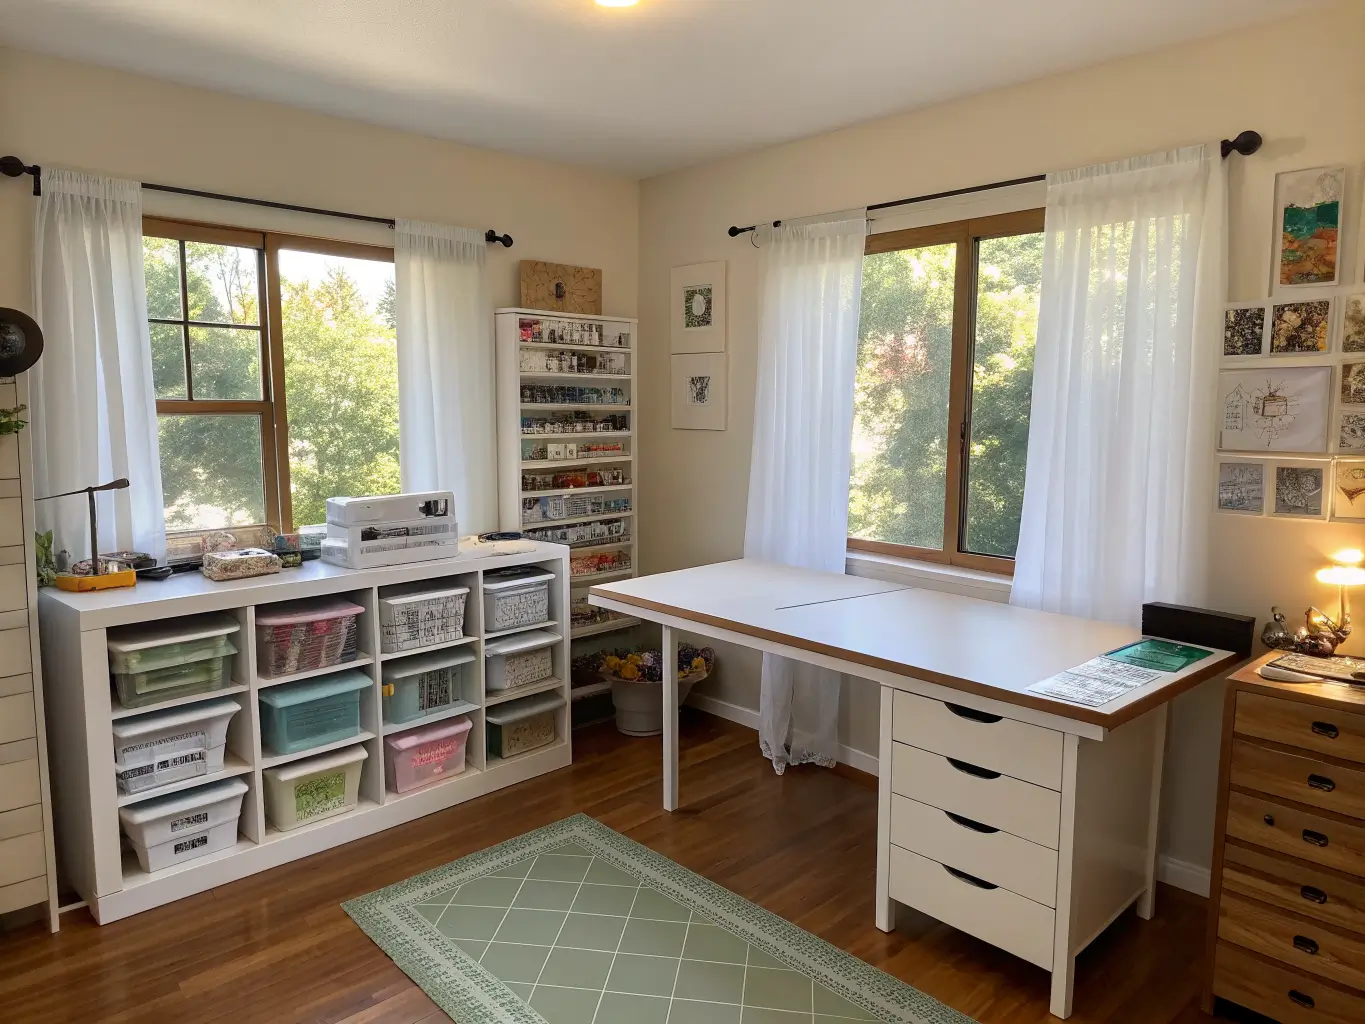
What This Style Actually Looks Like, and Who It’s For
IKEA craft room ideas are everywhere online, but most of them show one gorgeous finished photo and skip the part where you figure out why your paper won’t fit in the cubes you bought. I’ve rebuilt my own craft corner three times — once in a bedroom closet, once in a shared office, now in an actual spare room — and every version taught me something the last one got wrong. This is what I’d tell you if you were standing in my kitchen asking where to start.
The IKEA craft room look is functional modern — white or light wood furniture, clean lines, storage that’s built to be seen into, not just shoved shut. Think Scandinavian minimalism crossed with a workshop. It’s not fussy, and that’s the point: the room is supposed to work harder than it looks.
It’s the right fit if you’re a scrapbooker, cardmaker, sewist, Cricut or vinyl person, or you’ve got a kid’s art station taking over your dining table. It works in a closet, a corner of a guest room, or a whole spare bedroom. I’ve done the closet version — a LINNMON desk, one KALLAX turned sideways, done — and the full-room version with an island in the middle. Both work. The difference is just how much you’re storing and how many “stations” you need.
Time and cost, honestly:
– A weekend gets you a basic refresh — flat-pack storage assembled, bins labeled, done.
– A full custom studio (multiple units, pegboards, a cutting table) takes several days once you factor in assembly and sorting through your existing supply chaos.
– Budget setups start around a LINNMON/ADILS desk (about $60-90) plus one or two storage pieces. Built-out rooms usually center on KALLAX, ALEX, SKÅDIS, RÅSKOG, and BILLY — the five pieces that show up in nearly every craft room I’ve seen or built.
The Must-Have Pieces (And Why Each One Earns Its Spot)
I used to think you needed a Pinterest-perfect matching set. You don’t. You need pieces that solve specific storage problems.
– KALLAX shelf unit — the anchor piece, full stop. The cube openings are 16″ x 16″, which is exactly right for vertical paper storage, bins, and even tucking a sewing machine into a cube. Add the paper-insert accessories and it handles 12″ x 12″ cardstock without curling.
– ALEX drawer unit — this is where small stuff lives: ink pads, adhesives, buttons, Cricut blades. I keep two Cricut machines stored in the wide top drawers of mine, cords and all.
– SKÅDIS pegboard — mount this above your desk and every pair of scissors, ribbon spool, and paintbrush you use daily gets a hook. Nothing beats grabbing a tool without opening a drawer.
– RÅSKOG cart — mine rolls between my cutting table and my machine. It’s not decorative, it’s a mobile supply station, and once you have one you’ll wonder how you worked without it.
– BILLY bookcase — binders, pattern storage, printer paper, overflow bins. The unsung workhorse.
– LINNMON tabletop on ALEX or KALLAX legs — the cheapest, sturdiest desk surface you’ll find, and wide enough for a cutting mat plus a machine.
– LACK shelf or picture ledges above the desk for overflow and quick-grab items.
– Storage boxes — KUGGIS, SAMLA, TJENA, VARIERA. I use clear KUGGIS bins for anything I need to see at a glance (ribbon, vinyl sheets) and lidded TJENA boxes for things I don’t need to look at daily (spare hardware, seasonal stuff).
Optional Upgrades That Make It Feel Less Like a Warehouse
Once the function is handled, layer in a little personality:
– Swap in seasonal bins or themed paper collections without touching the base furniture — keep the furniture neutral and let supplies bring the color.
– Add woven baskets or a wood-toned tray to soften all that white laminate. My first version was so white and plastic it felt like a supply closet, not a room I wanted to sit in.
– Brass or black hardware, metallic label holders, or a black metal rail instead of white — small details that make it read “designed” instead of “assembled.”
– Add furniture legs to a KALLAX or ALEX for a more finished, less flat-pack silhouette.
How to Actually Put It Together
Prep first. Clear the room completely. Sort everything into keep, donate, and store piles before a single IKEA box gets opened — I skipped this step the first time and ended up reorganizing the same shelf four times because I kept “discovering” things I’d already half-stored.
Zone the room before you buy anything: cutting, sewing, paper storage, tool storage, packaging. Not every zone needs to be big, but each one needs a home.
Place big furniture first. KALLAX, BILLY, ALEX go in before the desk. Position the desk near your best natural light and closest outlet — I moved mine three times before realizing the outlet location should’ve decided the layout from day one.
Build up from there:
1. Install the desk surface — tabletop on ALEX or KALLAX legs.
2. Add drawer organizers for small stuff (ink pads, buttons, adhesives).
3. Mount pegboards, shelves, or picture ledges for tools and visual storage.
4. Store bulk items — paper, fabric, machines — in cubes and bookcases.
5. Style visible surfaces only where it helps you work faster. Label everything.
6. If space allows, add a rolling cart or small island for cutting and sorting.
Mistakes I’ve Made So You Don’t Have To
– Open shelving only. Looks great in photos, turns into visual chaos within a month. Mix open and closed storage — I learned this the hard way when my “pretty” open ribbon shelf became a dust-collecting tangle within six weeks.
– Ignoring paper size. Standard cardstock and scrapbook paper is 12″ x 12″. If your cubes or bins are smaller, you’ll be folding paper or storing it wrong. Measure before you buy.
– Skipping vertical storage. In small rooms, the wall above your desk is your best real estate. Use it.
– Desk too small. If you’re running a Cricut or a cutting mat, a 24″ deep tabletop isn’t enough. Go wider — combine two LINNMON tops if you have to.
– No mobility. If more than one person or more than one craft uses the room, add casters or a cart. Static furniture assumes static use, and craft rooms rarely stay that way.
– No labels. This one’s boring advice but it’s the difference between a five-minute cleanup and a twenty-minute one. Label the bins, not just the shelves.
Keeping It Cohesive Over Time
Stick to two or three tones max across bins, furniture, and labels — white, black, and one wood tone, say. Repeat the same container style within each zone: all paper in the same bin system, all tools on the pegboard, all embellishments in matching lidded boxes. That repetition is what makes a room full of craft supplies look organized instead of chaotic.
Seasonal refreshes are easy: rotate ribbon colors, swap in a holiday bin, refresh a few shelf accents. The furniture stays put; only the surface details change.
Budget-friendly growth path: start with one KALLAX or ALEX unit, live with it for a month, then add a cart or pegboard once you know what you’re actually missing. I wasted money buying a full matching set upfront the first time — half of it sat empty for a year because I didn’t yet know my own workflow.
Cross-style variations worth trying:
– Boho + IKEA craft room: woven baskets, warm wood, soft neutrals over the white storage.
– Modern minimal: black rails, clear bins, monochrome palette, everything closed and controlled.
– Family craft zone: a lower kids’ desk paired with durable, easy-access bins for the chaos that comes with actual children using the space.
The furniture is the easy part. The real work is figuring out your own zones and sticking with the same container logic long enough for it to become a habit. Give it a season before you judge whether the layout’s right — mine didn’t click until the second round.
For another angle on this, my ikea craft room guide covers the same space from a different starting point.