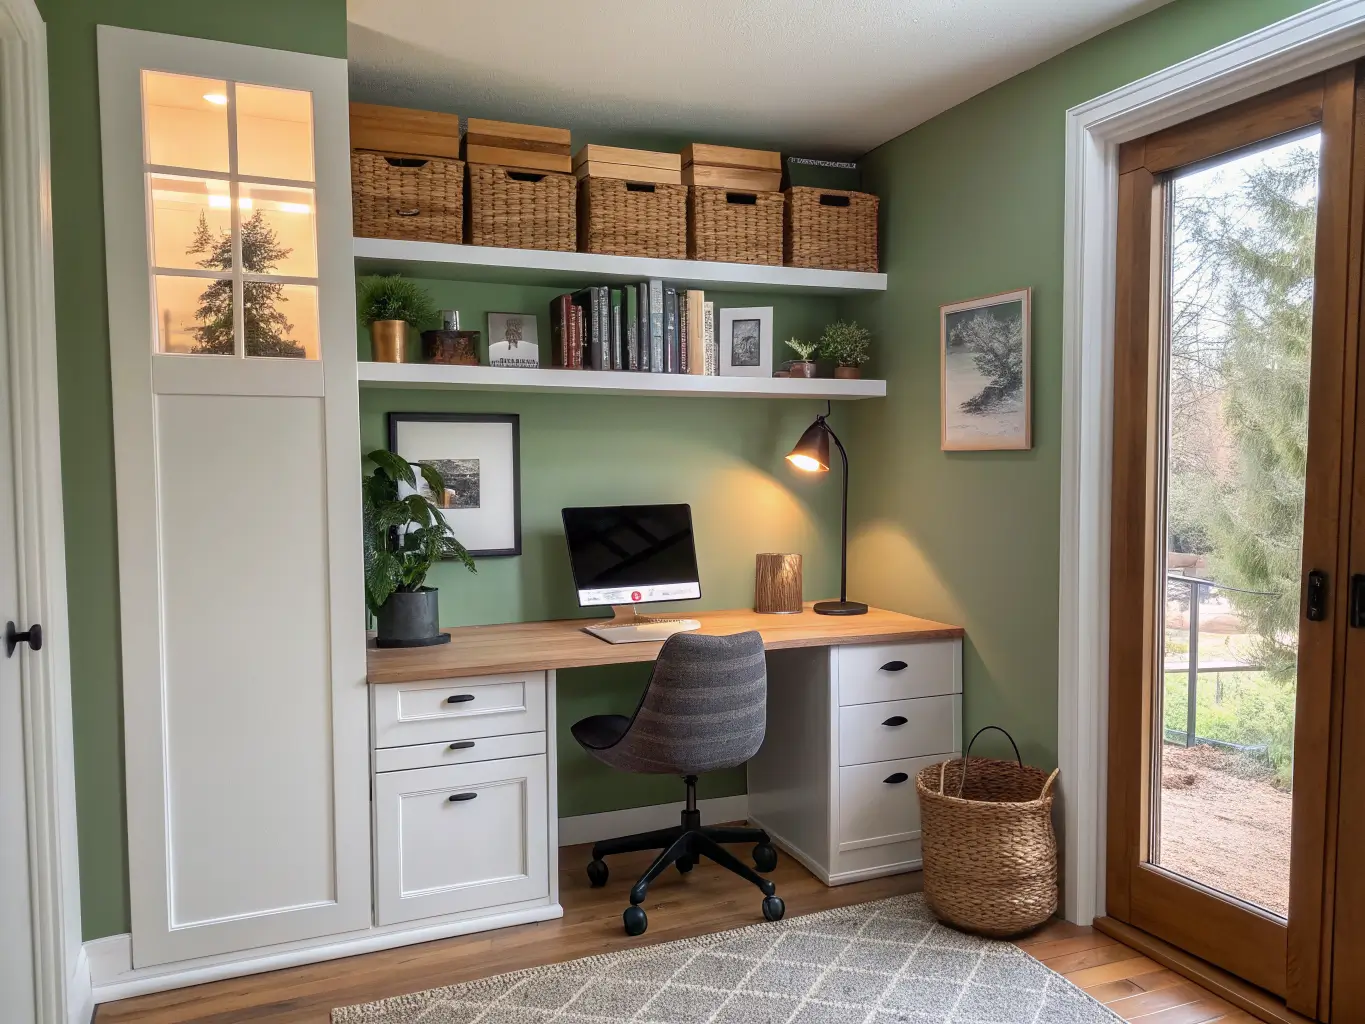
A cloffice — closet plus office — is exactly what it sounds like: a work zone built inside a closet’s footprint. It works in a reach-in bedroom closet, a hallway closet, an under-stairs nook, or even a small walk-in, as long as you’ve got room for a work surface, somewhere to sit, and space overhead for storage.
This is the move for:
– Remote or hybrid workers without a spare room
– Students who need a defined study spot
– Parents who need a workspace that disappears when the workday ends
– Anyone with an underused closet and an overused kitchen table
The style itself is flexible. I’ve seen cloffices that read modern minimalist with white shelving and black hardware, and I’ve seen ones that go full glam with brass sconces and a mini chandelier. The bones — desk, storage, light, seat — stay the same. The finish is where you get to have fun.
Quick Snapshot: Time, Cost, and Skill Level
Before you start ripping out closet rods, know what you’re signing up for.
– Time: A shelf-and-decor cloffice can come together in an afternoon. A fuller build with paint, lighting, and a custom desktop runs 1–3 days. Add electrical work or custom carpentry and you’re looking at longer, plus possibly hiring someone.
– Cost:
– Budget ($100–$400): shelving, bins, a lamp, paint, decor
– Mid-range ($500–$1,500): floating desktop, real shelving system, a proper chair, task lighting
– High-end ($2,000+): custom built-ins, an electrician adding outlets, wallpaper, upgraded seating
– Skill level: Beginner-friendly if you’re working with shelves and decor. Intermediate to expert if you’re building a fitted desktop, running new wiring, or removing structural elements like a closet header.
My own build landed right in the middle — about $650, most of it going to a butcher block countertop I still don’t regret.
The Must-Have Pieces
The Desk or Work Surface
This is the anchor. Your options: a floating desk, a butcher block or plywood desktop cut to fit the closet’s width, a narrow writing desk that slides in, or a pull-out shelf if you need the closet to double back to storage duty on weekends. Measure the closet’s interior width and depth before you buy or cut anything — I learned this the hard way when my first desktop measurement was off by two inches and the whole thing sat crooked against the back wall.
Seating That Tucks Away
You need a chair or stool that fully disappears under the desk when you’re done — otherwise the closet doors won’t close, and the whole hidden workspace idea falls apart. A compact task chair, a backless stool, or a swivel chair on small casters all work. Skip anything with wide arms or a bulky base.
Storage That Goes Vertical
Floating shelves, cubbies, stackable bins, file boxes, baskets — this is what keeps your desktop clear. In a cloffice, vertical space is your only real estate, so use it. I run three shelves above my desk: files at eye level, reference books above that, and rarely-touched supplies on the top shelf I need a step stool to reach.
Lighting (Non-Negotiable)
Closets are dark by design — that’s the whole problem you’re solving. A single overhead bulb will not cut it for actual work. Layer in:
– A plug-in wall sconce or two
– Under-shelf LED strips to kill shadows on the desktop
– A small task lamp for close work
– If you’re going all-in, swap the ceiling fixture for a small pendant or mini chandelier
Power Access
You need an outlet close enough to run a laptop, monitor, charger, or printer without a spaghetti of extension cords. If there’s no outlet nearby, this might be the one place worth calling an electrician — trying to power a whole workspace off a cord run under the door is asking for a hazard, not a home office.
A Wall Treatment
This is the difference between “closet with a desk shoved in it” and an actual designed space. Paint the back wall a color that contrasts with the rest of the room, hang wallpaper, add board-and-batten, or go bold with chalkboard paint if you want a spot for notes. I painted mine a deep sage against white shelving, and that one wall is doing more visual work than everything else in the closet combined.
Optional Touches Worth Considering
Once the essentials are in, this is where personality comes in:
– Organic texture: a small potted plant, a stem of eucalyptus, a woven jute rug scrap by your feet
– Metallic accents: brass hardware, a mirrored tray for supplies, a lacquered pencil cup
– Statement details: a small gallery wall on the inside of the closet door, an arched mirror, decorative wall hooks for a bag or headphones
Don’t add all of these. Pick two, max.
How to Actually Put It Together
Prep first. Empty the closet completely. Measure width, depth, and ceiling height — write it down, don’t trust your memory. Decide if the doors are staying. I removed mine entirely and now use a curtain on a tension rod, which gives me the “hidden” effect without the swing space a door needs. Sliding doors work too if you want to keep it closed off. Some people keep hinged doors and just live with propping them open — totally fine if space allows.
Then build in this order:
1. Install the desk at standard desk height (around 28–30 inches), against the back wall or the longer side, depending on your closet’s shape.
2. Add overhead storage — shelves, bins, boxes — with daily items at eye level and overflow up top.
3. Layer your lighting before you style anything else. You want to test it while the closet is still empty enough to reposition a lamp or sconce.
4. Bring in the chair and check that it slides fully under the desk with room to spare.
5. Finish the wall with paint, wallpaper, or paneling — this is genuinely the step that makes it look intentional instead of improvised.
6. Style lightly — one piece of art, a small vase, a pinboard. Stop before the desktop feels busy.
Mistakes I’ve Made (So You Don’t Have To)
– Buying a desk too deep for the closet. Mine was originally 24 inches deep in a closet that could only comfortably fit 20. The chair kept hitting the door frame. I swapped it for a slimmer 18-inch desktop and suddenly had room to actually push the chair in.
– Relying on one ceiling bulb. I worked like this for two weeks before caving and adding sconces. My eyes thanked me immediately.
– Letting supplies pile on the desktop instead of using the shelves I’d already installed. Vertical storage only works if you actually use it.
– Choosing a chair with arms that wouldn’t fit under the desk — a rookie mistake that meant the door never fully closed.
– Overdecorating. My first pass had three framed prints, a plant, a candle, and a desk organizer all competing for a 30-inch desktop. I pulled two things and it breathed instantly.
– Ignoring ergonomics. A cloffice is still a real workspace. Get your screen at eye height and don’t skip a chair with basic lumbar support just because the space is small.
Keeping the Look Fresh Without Redoing It All
Stick to 2–3 core colors plus one accent — I run white, sage, and warm wood, with brass as the single metallic accent. Repeating the same material combo (wood plus brass plus woven baskets, or white plus black plus oak) reads as designed rather than thrown together.
Match your storage. Coordinated bins and consistent frame finishes make the whole thing look like one decision instead of ten separate ones.
For seasonal refreshes, don’t touch the furniture — swap the cheap stuff:
– New art print or swapped-out desk calendar
– Fresh (or faux) florals
– A different throw pillow if there’s a stool or bench nearby
Budget-conscious updates before you commit to custom cabinetry: peel-and-stick wallpaper, thrifted baskets, clip-on lights, and DIY shelf brackets from the hardware store. I upgraded my closet twice with under $50 each time before I ever touched the desktop itself.
Whatever style you land on — boho with plants and woven texture, modern with black metal hardware, or glam with brass and a little chandelier — the formula underneath stays the same: clear surface, vertical storage, real light, and a chair that disappears when you’re done for the day.
For another angle on this, my home office ideas guide covers the same space from a different starting point.