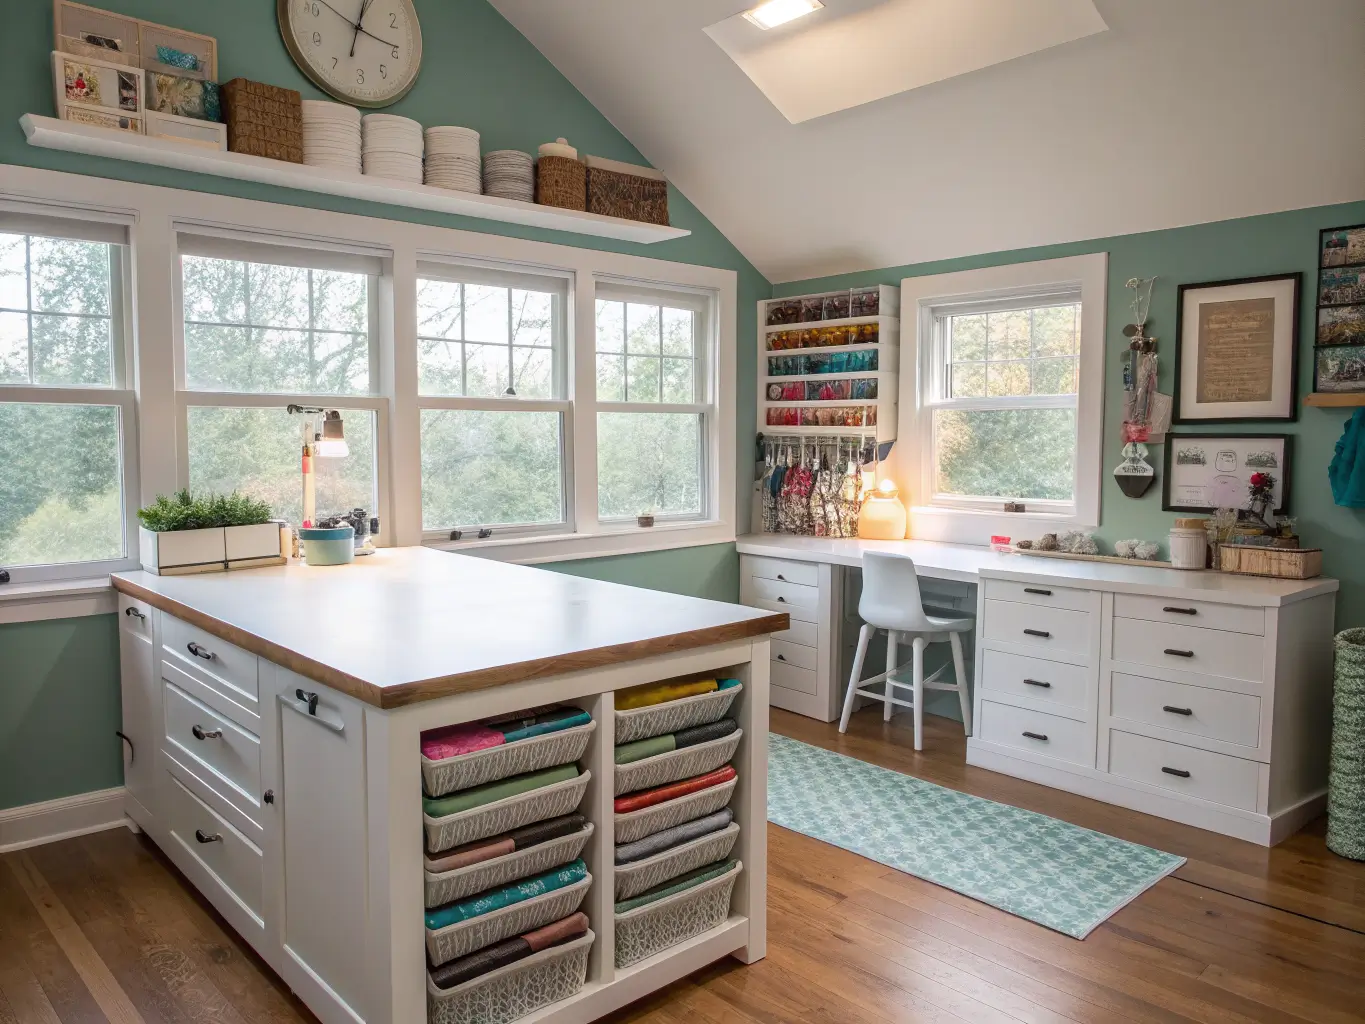
A dream craft room means one thing to almost everyone who asks me about it: a space where you can actually find your ribbon without dumping out three bins first. That’s it. That’s the dream. Not a Pinterest-perfect studio with color-blocked yarn walls — a room where the scissors are where you left them.
I turned a spare bedroom into my craft space two years ago, and I’m on my third layout. So I’ve made most of the mistakes already. Let me save you the time.
What This Style Actually Is
There’s no single “craft room aesthetic.” I’ve seen gorgeous versions in modern farmhouse, boho, transitional, even strict minimalist styles. What every good one has in common isn’t a color palette — it’s function that doesn’t look like a warehouse.
The rooms that work are personalized and organized first, pretty second. That order matters. A room that’s all decor and no system falls apart after your second real project weekend.
Who this is for: scrapbookers, sewists, painters, paper crafters, gift wrappers, yarn people, anyone juggling more than one supply category. If you only have one hobby and one bin, you don’t need this article — you need a shelf.
Where it works: spare bedrooms, a corner of a guest room, a closet, an attic nook, even a repurposed dining room. I used my dining room for eight months before moving to a spare bedroom, and honestly the dining room version worked fine — it just meant hosting Thanksgiving somewhere else that year.
Time, Cost, and Space: The Real Numbers
Setup time ranges wildly depending on what you’re starting with:
– A simple nook using furniture you already own: a weekend, maybe less
– A full room build with new shelving, a proper desk, and a lighting plan: several days to a few weeks, mostly waiting on furniture assembly and shelf installation, not actual decorating
Budget breaks into three real tiers:
– $200–$600 — a desk, a pegboard, some bins, a rolling cart. This is where I started and it’s genuinely enough to function well.
– $800–$2,500 — modular shelving, real task lighting, better storage systems, a proper chair
– $3,000+ — all-in-one furniture systems like the DreamBox, which is basically a craft workstation in a box. I looked at one, balked at the price, and built my own version with an IKEA desk and open shelving for a third of the cost. No regrets, though I’ll admit the DreamBox’s built-in organization is smarter than anything I cobbled together.
Space needed: anywhere from a closet to a full room. Square footage matters less than layout. I’ve seen a 6-foot closet nook that functioned better than a spacious guest room because the closet had actual planning behind it.
The Non-Negotiables: What Every Craft Room Needs
A work surface bigger than you think you need
This is the mistake I made first. My original desk was 30 inches wide — fine for a laptop, useless for cutting fabric or laying out a scrapbook spread. I replaced it with a 50-inch kitchen island, the same move HGTV has featured more than once, and it changed everything. You need room to spread out mid-project, not just a spot to set a laptop.
If you’re tight on space, look at a table that folds down against the wall, or a desk with a pull-out extension. But don’t go smaller than 36 inches deep if you can help it — anything shallower makes cutting mats and sewing machines feel cramped.
Real storage, not a junk drawer
Shelving, cubbies, drawers, cabinets — pick a mix, not just one. Supplies multiply. I don’t know a single crafter whose stash got smaller over time.
The trick that actually made my room look put-together instead of chaotic: go vertical first. Floor space disappears fast with craft rooms because tables, chairs, and carts all eat square footage. Shelves up the wall keep your floor clear and your tools visible.
A pegboard, framed like it belongs there
Pegboard is the single most repeated recommendation in craft room setups, and for good reason — scissors, rulers, ribbon spools, and small tools all hang in plain sight instead of buried in a drawer. The upgrade that makes it look intentional instead of garage-workshop: frame it. A simple wood trim around the board’s edge turns “tool wall” into “design feature.” Mine is framed in the same white as my shelving, and it reads as decor, not utility.
Clear bins, labeled
Acrylic boxes, glass jars, repurposed spice jars, magazine holders — whatever the container, make it clear and label it. I tried open baskets with no labels for the first few months and every session started with me digging through four baskets looking for washi tape. Clear + labeled turns storage into a system you can see at a glance.
Light you can actually work under
Task lighting is not optional. I have a window on one side of my room and added a swing-arm task lamp clamped to the desk for evening sessions. Detail work — hand-stitching, small paper cuts, painting — needs direct light, not just ambient overhead glow.
A chair that supports actual sitting time
I ignored this for a year and used a $40 folding chair. My back told me to stop. If you’re spending more than an hour at a time at that table, buy a real chair with lumbar support. This is not the place to save money.
Something on wheels
A rolling cart is the one accessory I’d never cut from a budget. Mine holds active-project supplies and rolls between my desk and the cutting mat on the floor when I need more space. It’s the single most-used piece of furniture in the room, more than the desk itself some days.
Optional But Worth It: The Layer That Makes It Feel Like a Room, Not a Storage Unit
Once the system works, you can layer in the parts that make it feel good to be in:
– Seasonal accents — swap ribbon colors, a few art prints, or a small floral arrangement by season. Takes ten minutes, changes the whole feel.
– Organic texture — a woven basket, a wood-framed mirror, a jute rug under the desk. My room was all hard surfaces (metal shelving, acrylic bins, laminate desk) until I added a rug and a small plant, and it stopped feeling like a supply closet.
– Metallic accents — gold drawer pulls, a brass desk lamp, black picture-frame hardware. I swapped my plain silver drawer pulls for brushed gold ones, total cost under $30, and the whole room reads more finished.
– A place to sit that isn’t the desk chair — if you have room, a small reading chair or even a floor cushion gives the room a second gear. Mine has a secondhand armchair in the corner where I actually plan projects before I touch the table.
Color and Layout: How I’d Put It Together
Pick 2–3 colors and repeat them everywhere — in bins, labels, the pegboard frame, the rug. My palette is white, warm gray, and a muted teal, with brass hardware as the accent. Craft supplies are already colorful and chaotic by nature; a tight palette in the fixed elements is what keeps the room from feeling like visual noise.
Set up zones, not just storage. My room breaks into:
– Cutting/prep zone (the island)
– Sewing zone (a smaller desk against the wall with my machine permanently set up)
– Drying/finishing zone (a narrow shelf near the window for painted pieces)
– Storage wall (the pegboard plus cubbies)
Each zone has exactly what it needs and nothing else. This stopped the “everything ends up on the big table” problem I had for the first six months.
Let your supplies be the decor. Color-sorted paper stacked in open cubbies, ribbon spools on a wall rack, buttons in graduated glass jars — this stuff looks intentional when it’s organized and messy when it’s not. Same materials, totally different impression depending on whether you sorted them.
Give the room one focal wall. Mine is the framed pegboard. Yours could be an open shelving run or a yarn display. Pick one wall to be the “look here” moment so the rest of the room can stay quietly functional.
Setting It Up: The Order That Actually Works
1. Clear the room completely first, especially if you’re converting a dining room or guest room. You need to see the empty box before you plan it.
2. Sort every supply into keep, donate, relocate, store elsewhere before you buy a single storage bin. I skipped this step originally and bought bins that didn’t match what I actually owned.
3. Measure before you shop — wall spans for shelving, desk depth, and leave at least 36 inches of clearance around your main work surface so you can actually move a chair back.
4. Place big pieces first: desk, storage cabinet, shelving unit. Carts and small containers come last, once you know what gaps are left.
Where People Go Wrong
– Open shelves with no labeling system. Looks great in photos, falls apart in week three. Label everything or use uniform, opaque bins instead.
– Skipping task lighting. You’ll strain your eyes and quit projects early. Add a lamp even if the room has a window.
– Buying a desk too small for real work. I did this. Twice, actually — my second desk was still too shallow. Go big on the primary surface even if it means less floor space elsewhere.
– Ignoring the walls. If your storage is all floor-based bins and carts, you’re wasting the easiest space in the room. Vertical storage should come before you add a fourth floor cabinet.
– Decorating the work zone into uselessness. I once had so many decorative jars and frames around my desk that I had maybe a 12-inch clear patch to actually work in. Decor goes around the edges, not on the active surface.
Keeping It From Sliding Back Into Chaos
The visual consistency is the whole game long-term. Stick to your palette. Use matching or coordinating bins even if you buy them at different times from different stores — same color family, same general shape. Keep the main table clear as a standing rule, not just a one-time tidy.
Seasonal refreshes are cheap and easy: swap ribbon colors, change a few art prints, rotate in holiday-specific bins. None of this requires touching your actual system.
Budget-wise, start with the basics — pegboard, cart, shelves, clear bins, a few magazine holders for paper storage — and upgrade later. I’ve been slowly replacing my wire shelving with proper melamine cabinets over the past year, one piece at a time, as budget allows. No reason to do it all at once.
The room that actually gets used isn’t the one that looks best in a photo. It’s the one where you can find your good scissors on the first try.
For another angle on this, my craft room ideas guide covers the same space from a different starting point.